KeePassium 2.4 released
KeePassium 2.4 brings faster sign-ups, smarter AutoFill, drag-and-drop and multi-item operations, better keyboard support, passkey fixes, and more.
Faster sign-ups
Now you can create new entries right when you need them — in AutoFill!
Whenever you open AutoFill, it will show the usual list of relevant entries as well as the new “Create Entry” button. Tap the button and KeePassium will show an entry creation dialog with all the fields already pre-filled automatically:
The username is pre-filled with the most frequent one from your database, but there is a button to choose a different frequent username or generate a random one. The password/passphrase is based on the last-used settings of the password generator. By default, new entries land in the root group, but you can also choose a different location.
Creating password entries in AutoFill is a premium feature. Like many premium features in KeePassium, it is merely a convenience: free users can still create new entries in the app itself. In turn, creating passkeys in AutoFill is free for everyone, since AutoFill is the only way to do that.
What took us so long?
The reason is technical challenges: AutoFill works with a very tight memory allowance and KeePassium was not ready for this. We had to optimize the memory footprint of the app, a process similar to converting a Boeing into a Cessna in mid-air.
Lately, it became clear that memory is not the only limit. AutoFill is now allowed to work with YubiKeys. It is not allowed to write to some locations, like “On My iPhone”. Moreover, it has to finish everything in a few seconds. Should anything go wrong, AutoFill would disappear from the screen with no way to tell whether it crashed or finished successfully.
As a solution, KeePassium AutoFill will first save changes to system keychain — a quick and secure storage for sensitive data. Then AutoFill will try to save changes to the database. If successful, your database will get automatically saved and synced. Otherwise, these pending changes will be stored locally on the device, and AutoFill will remind you to open the main KeePassium app to update and sync the database.
With that sorted out, let’s move on and take a look at the already existing entries.
Self-learning AutoFill
One of the most frequent questions in KeePassium’s subreddit is: how to make AutoFill suggest the right entry for each website? Easy, there’s a support article on how to improve AutoFill results. Over several pages, it describes how to find the page URL, how to paste it into the relevant entry, how relevance is estimated…
Yeah, you won’t need that anymore.
From now on, whenever you select an entry in AutoFill, KeePassium will automatically add the relevant URL to the entry. So the next time you visit the same website, AutoFill will know which entry to return. This is an opt-in feature (just in case you prefer to keep your database intact).
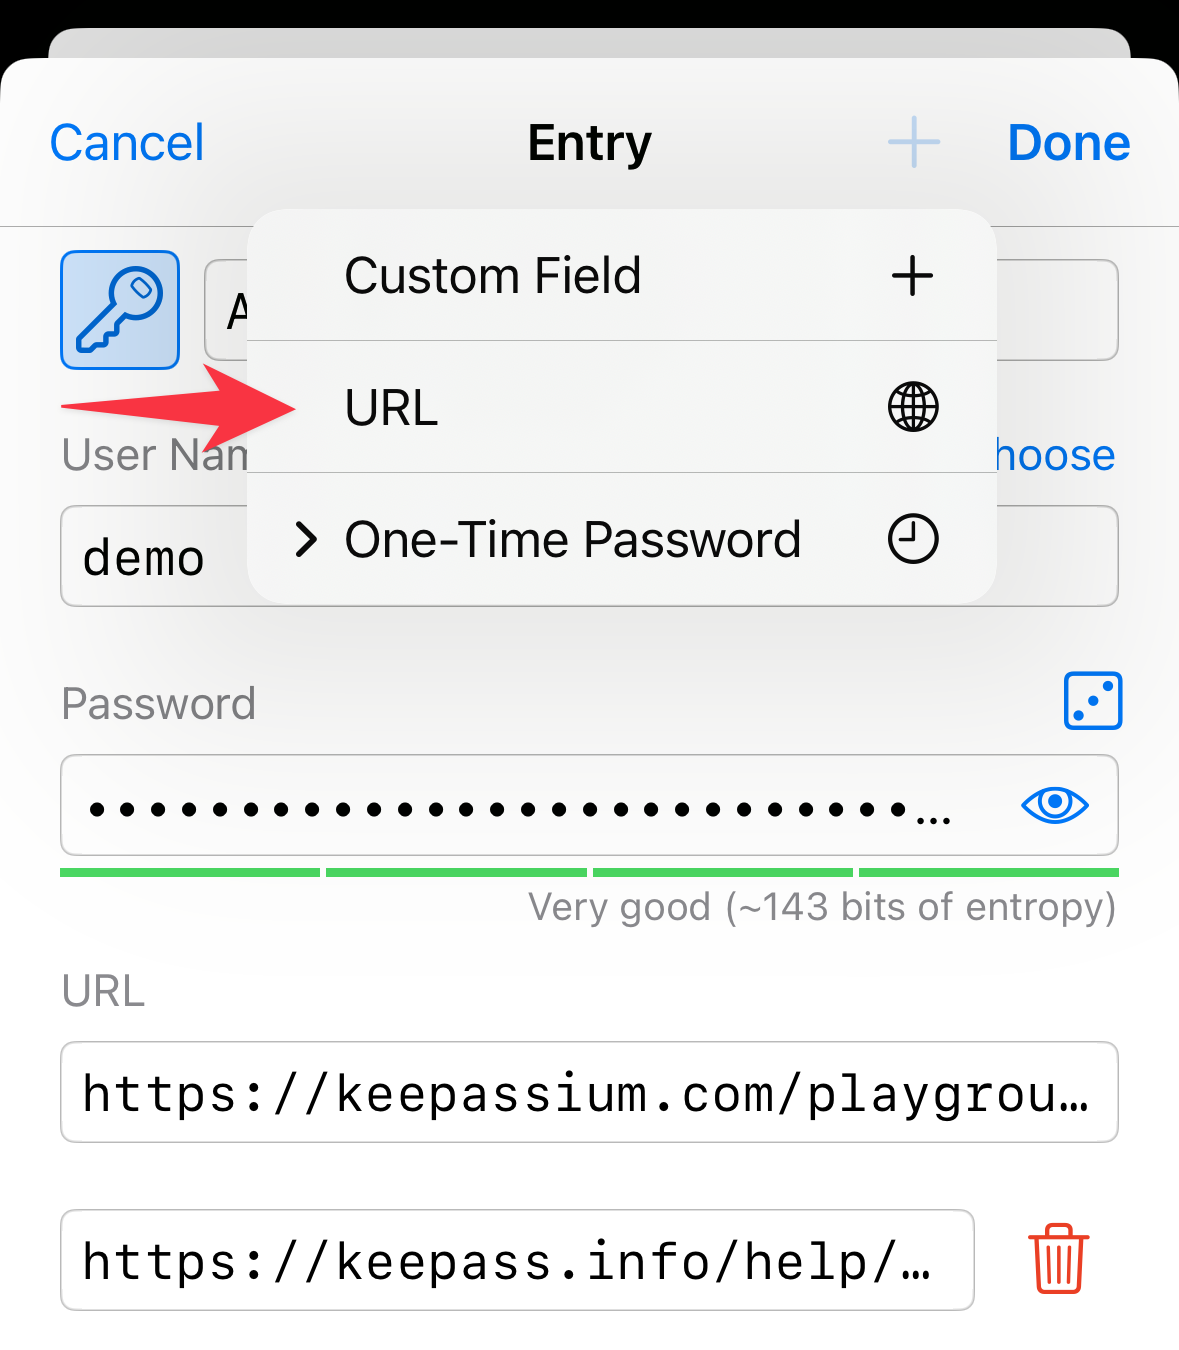
By the way, this also means that KeePassium supports multiple URLs per entry now. Some of you may know this feature from Keepass2Android.
macOS AutoType: Enter credentials to any app
Now that we have AutoFill entries fine-tuned — how do we get them into a login form?
I’m glad you asked. On iOS, this is easy: AutoFill works natively with all the web browsers. However, on macOS there is only one browser that supports the system’s Password AutoFill framework — Safari. For all the other browsers, the only path was to copy → switch apps → paste → repeat.
Good news! Now you can just click a button and KeePassium will automatically switch to the previous app and “type out” the username and password. This is done by sending virtual key presses to the system, as if you were typing on the keyboard.
There are a few caveats, though:
- Typed characters depend on the current keyboard layout. For now, KeePassium supports only the
en-USlayout, but we plan to extend this in the future. - The app types out a fixed sequence: username → Tab → password, which won’t work on multi-page forms. We might make the sequence customizable in the future — let us know if you need this.
- Pressing virtual keys requires the rather broad Accessibility permission:

On the bright side, AutoType works with any app, not only in web browsers.
Keyboard navigation on macOS and iPadOS
While we are on the topic of keyboard and desktop experience — keyboard navigation has significantly improved in AutoFill, settings, database, and file lists.
To make this happen, we… basically rewrote half of the app. On the one hand, this cleared the path for exciting new features (some of which are listed below). On the other hand, this took us almost 8 months. Unfortunately, this was only enough for half of the app, so the overhaul has not reached the right-side panel yet. We had to choose between releasing a partial redesign now and pushing the update far into the next year; we chose the first option.
Advanced interactions
Thanks to the deep improvements from the previous section, now you can manage your data in new ways:
- Drag and drop entries between groups.
- Reorder groups and entries however you like (just set the sort order to Custom first).
- Select and operate on multiple entries, groups, files, and icons at once.
- Navigate large databases using an alphabetical index, like a phone book (when items are sorted alphabetically, by title):

Finally, we have refined the toolbar which appears when you tap an entry field (coming to VoiceOver in a later update). Before, these actions were part of the blue overlay, displayed only for a second. Now, they show up as a menu and remain on the screen, so you can take your time to read all the options. Once done, tap “Compact View” and the bulky menu will shrink into a tiny popup.
Notable mentions
- Direct cloud connections now support reduced, app-folder-scope permissions.
- All the known passkey issues (with Google, Amazon, and QR-based setup) have been fixed.
- You can create passkeys in YubiKey-protected databases. On macOS, you can also use OnlyKey.
- Now you can select KeePassium as the default authenticator app for setting up verification codes. We made sure this works well with VoiceOver and the Camera app.
- Besides the camera, it is possible to scan QR codes from a file or a photo.
- You can also display an entry field as a QR code.
- There is an option to reset the app after a few failed passcode attempts.
- We have changed the search strategy from depth-first to the more appropriate breadth-first.
- KeePassium for macOS can import data from Apple Passwords (CSV) and Enpass (JSON).