How to use YubiKey with KeePassium
Initial setup
The following steps will prepare your YubiKey for the challenge-response mode.
- On your computer, install the YubiKey Manager and launch it
- Insert your YubiKey, if you have not done that yet.
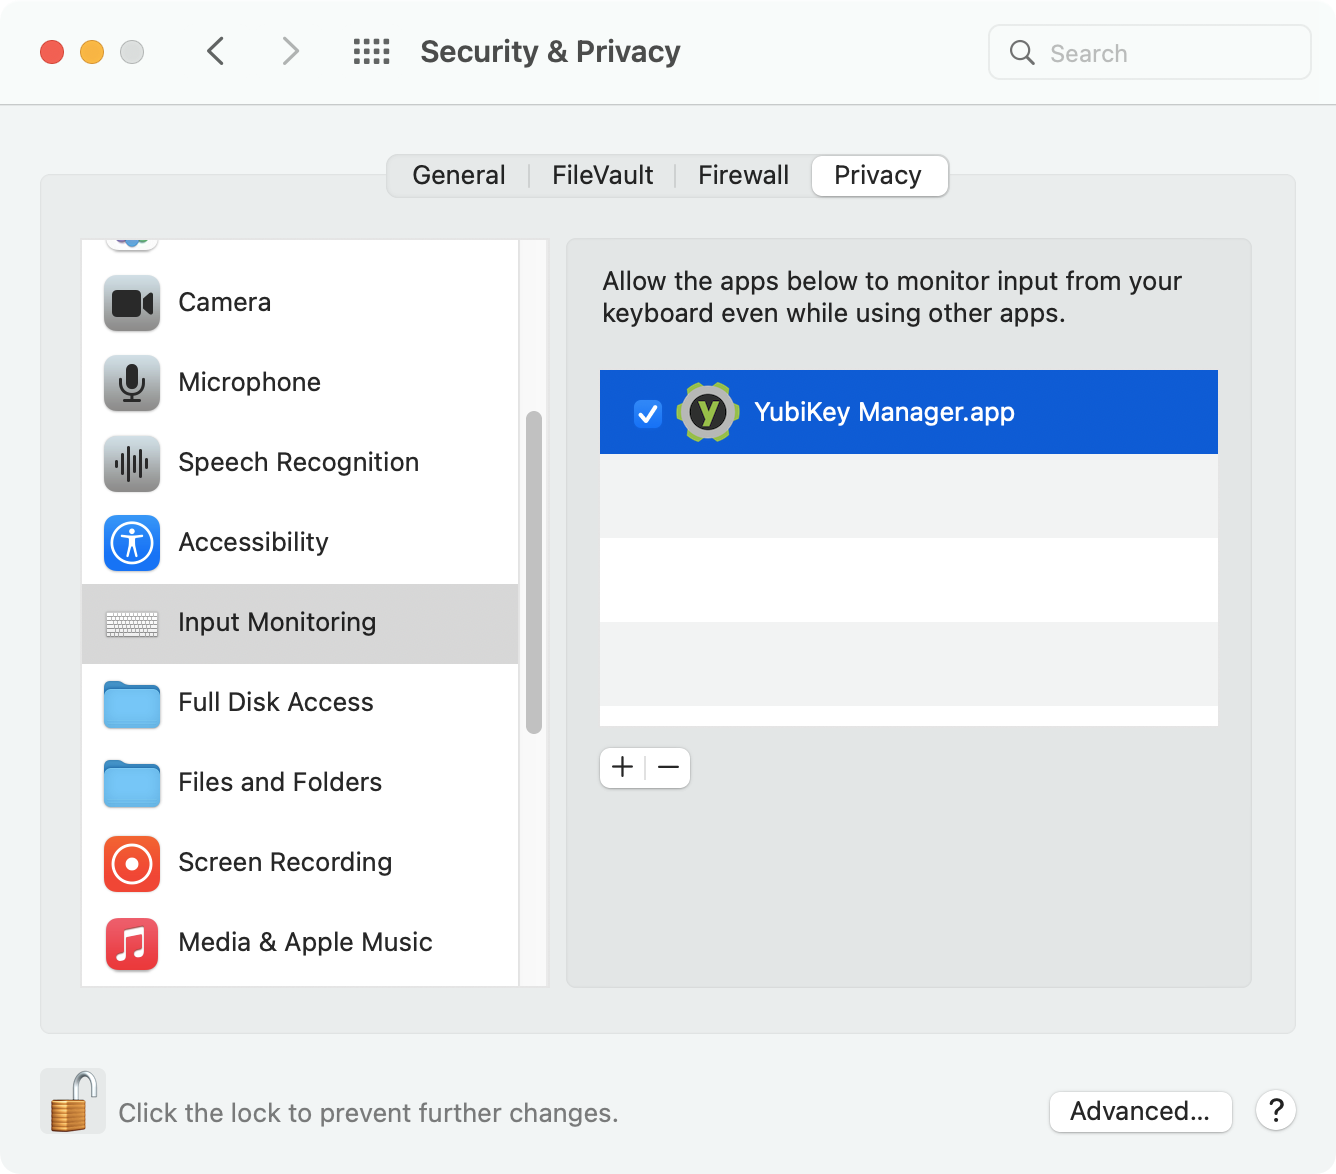
- If you see an “Unknown error occurred” on macOS, go to system preferences → Security & Privacy → Input Monitoring, and allow input monitoring for YubiKey Manager.
- Click Applications → OTP
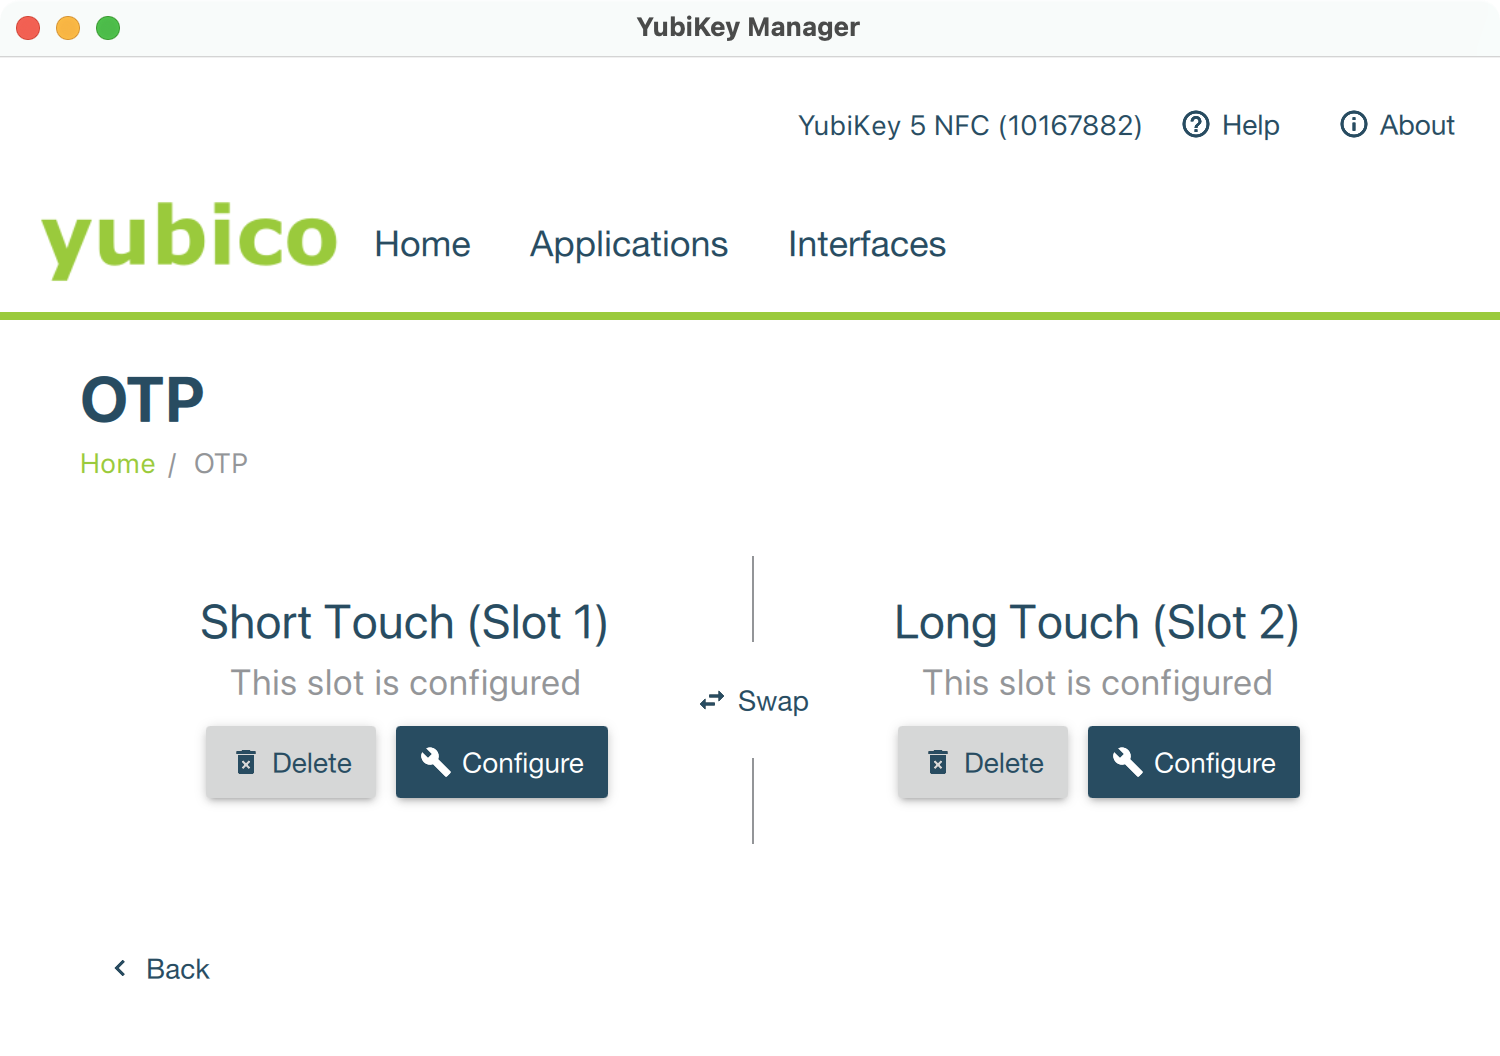
YubiKey Manager: OTP slot selection - Choose the slot to configure. The first slot is reserved in some keys, so select Configuration Slot 2.
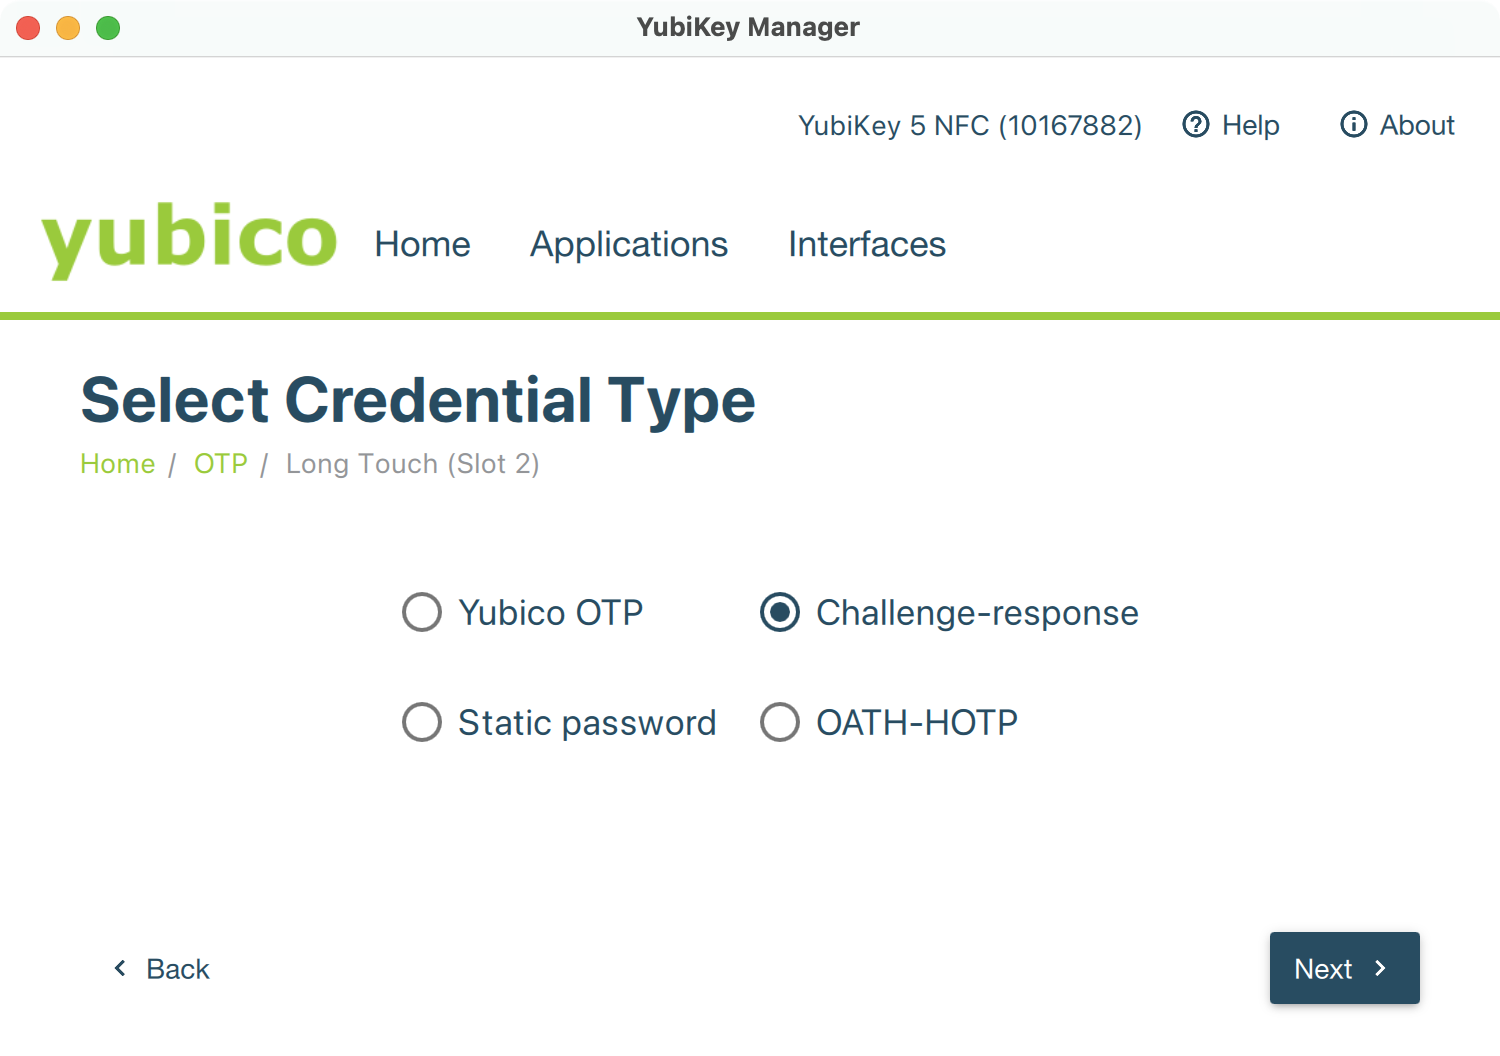
YubiKey Manager: OTP credential type - Select Challenge-response credential type and click Next.
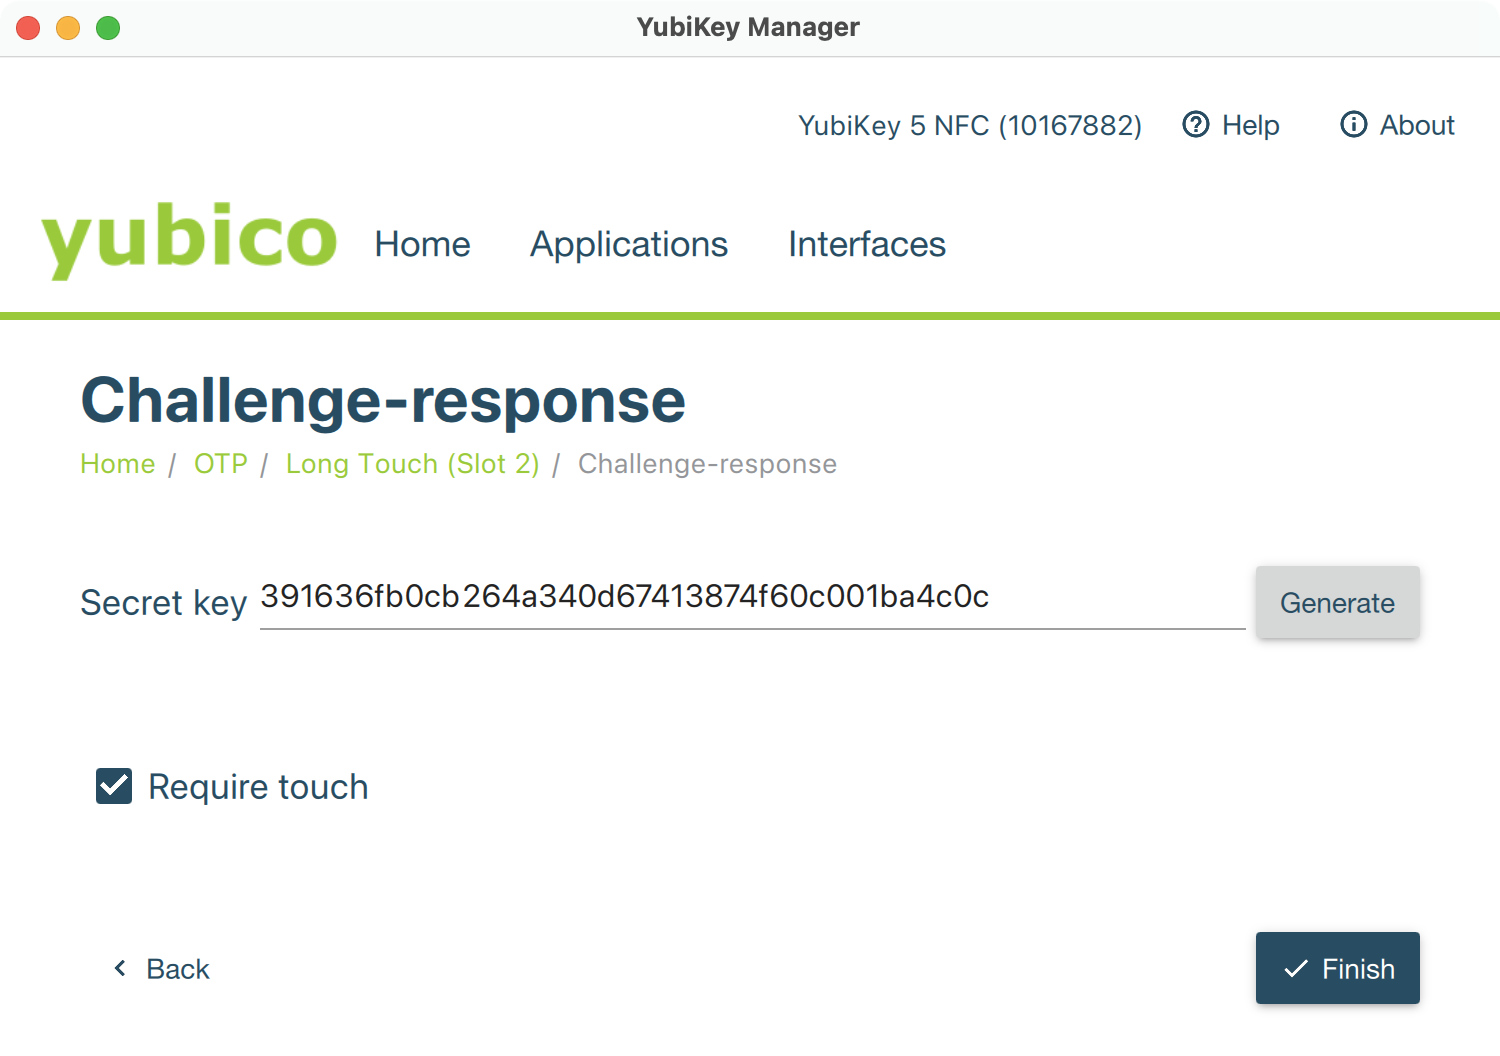
YubiKey Manager: Challenge-response secret key - Set your HMAC-SHA1 challenge-response parameters:
- Secret key — press Generate to randomize this field. Make sure to copy and store the generated secret somewhere safe. If you ever lose your YubiKey, you will need that secret to access your database and to program the replacement YubiKey.
- Require touch — this prevents rogue apps from talking to your YubiKey without your permission. When KeePassium requests your YubiKey, you will need to touch the “Y” button on the NFC key (or touch the sides of the YubiKey 5Ci key).
- Press Finish to program the YubiKey.
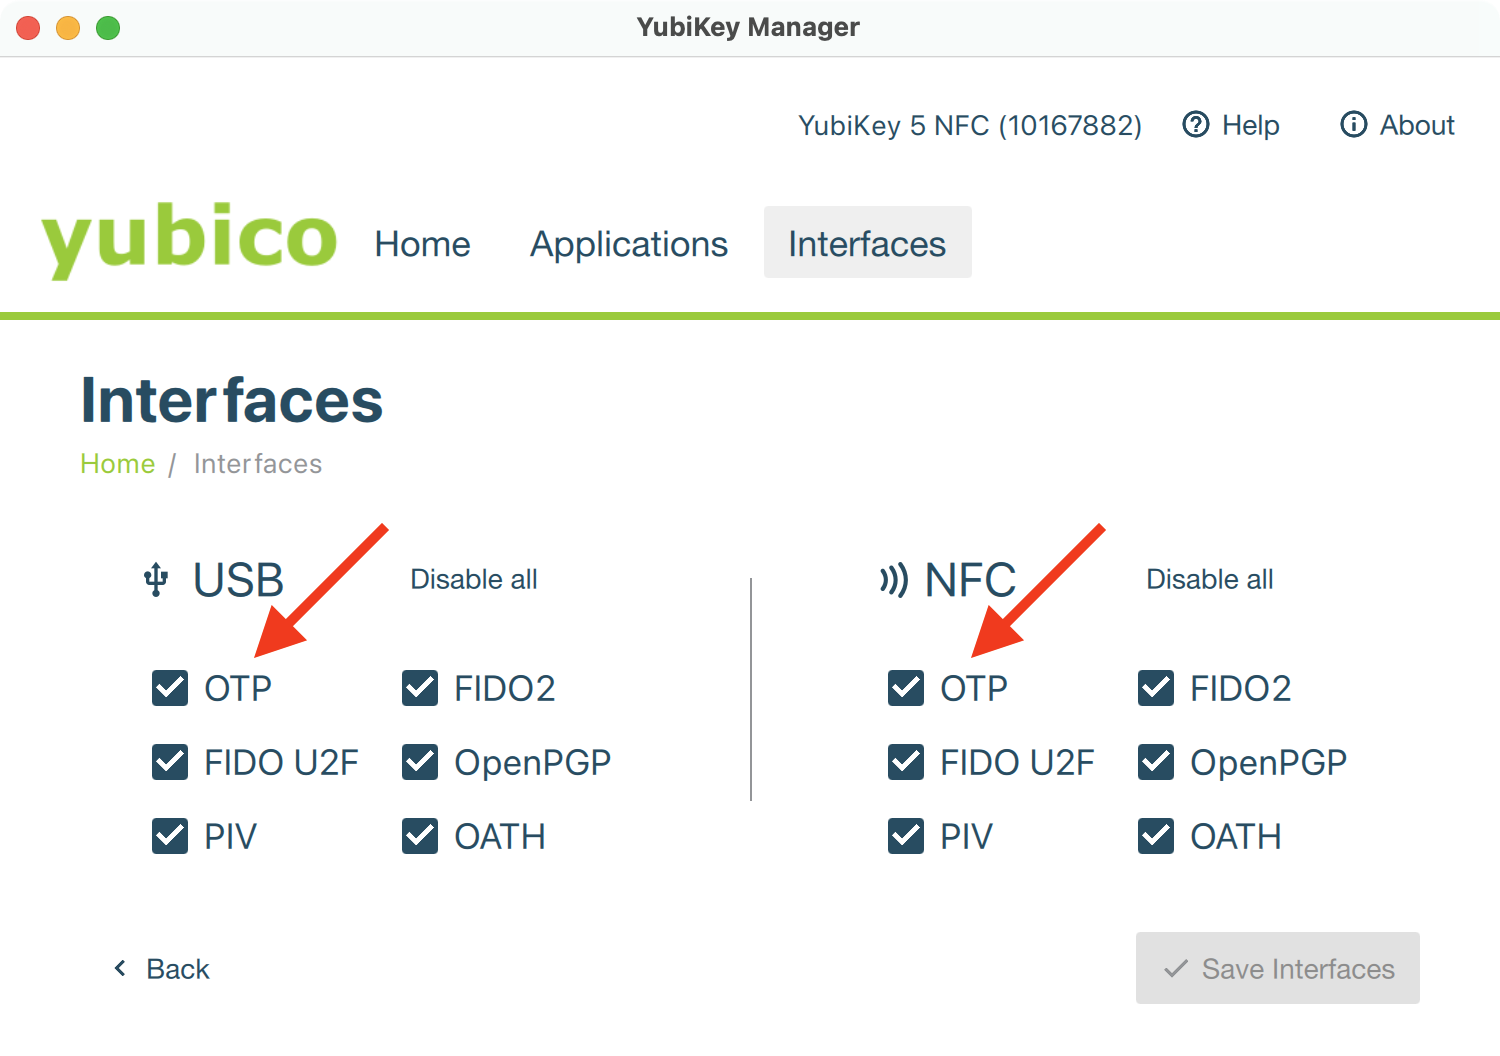
As a final step, make sure that apps can talk to your YubiKey. Click Interfaces and make sure that OTP is checked for both USB and NFC interfaces. (Otherwise KeePassium might show something like “YubiKey select applet failed with code 0x6A82”.)
Using YubiKey with your database
Once your YubiKey is configured, you can add it as a component of the database master key, along with a password and key file (or instead of them).
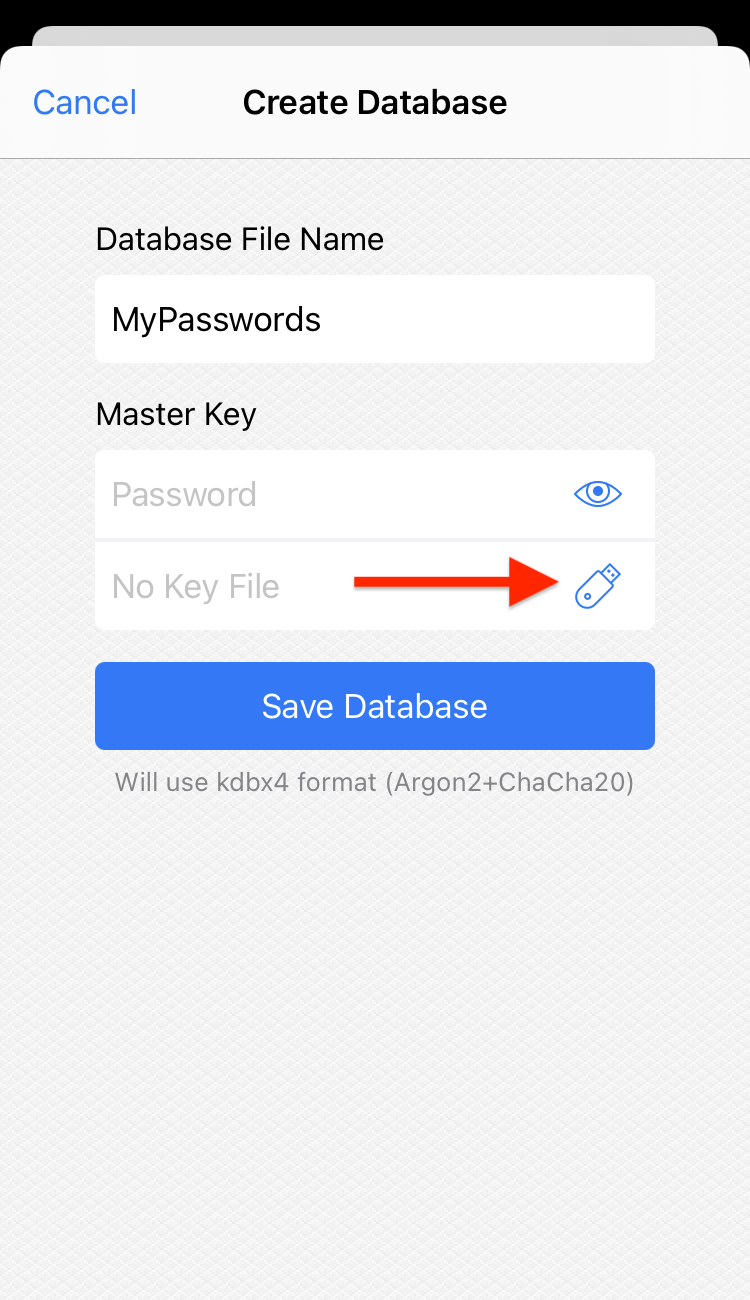
Set up a new database
When creating a new database, tap the hardware key button and select YubiKey Slot 2:

Set up an existing database
To make YubiKey a required master key component for your existing database:
- Open the database with the current master key (password and/or key file)
- Tap the Change Master Key button at the bottom of the screen:

- Tap the hardware key button and select YubiKey Slot 2:
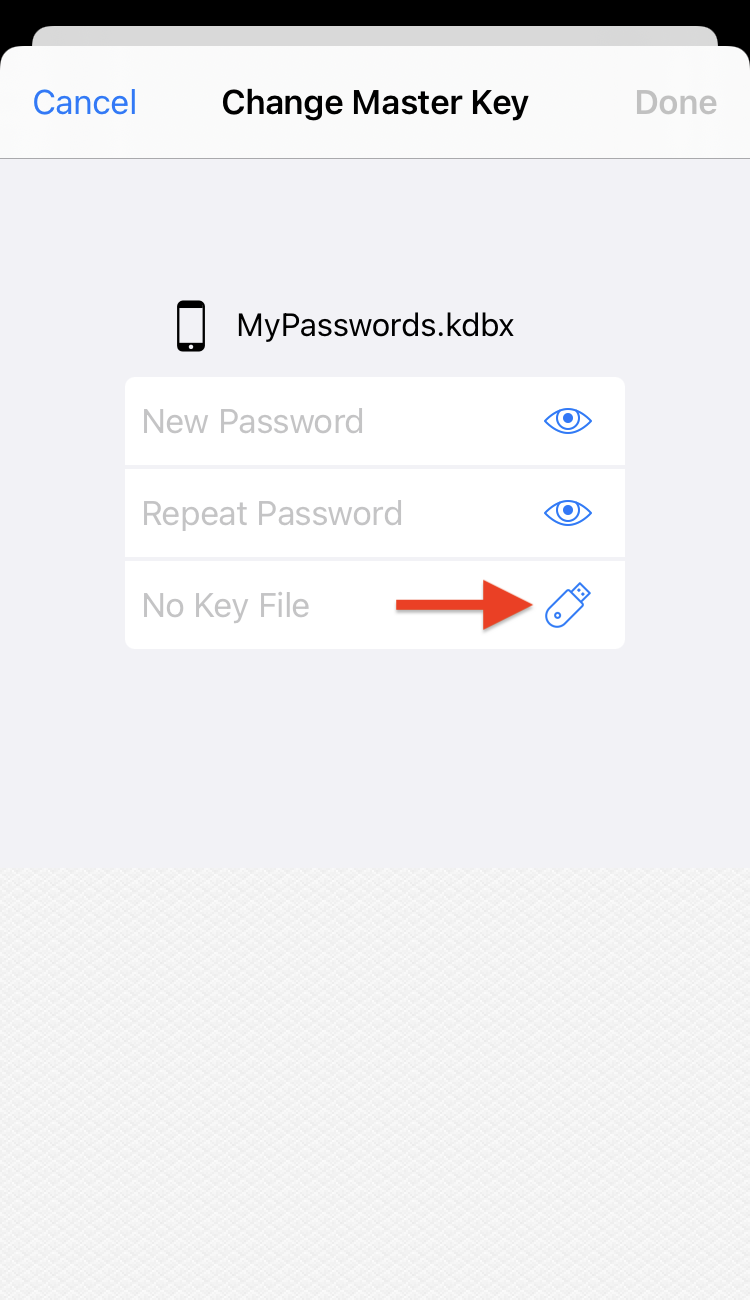
How to change the existing master key to include YubiKey - Tap Done to save changes.
- Once prompted, insert or scan your YubiKey (touch it with the top side of your phone).
- That’s it! Now the database can be decrypted only with your YubiKey.
Unlocking a database
To unlock a YubiKey-protected database, tap the hardware key button and select YubiKey Slot 2. If necessary, enter your password and/or choose the key file.
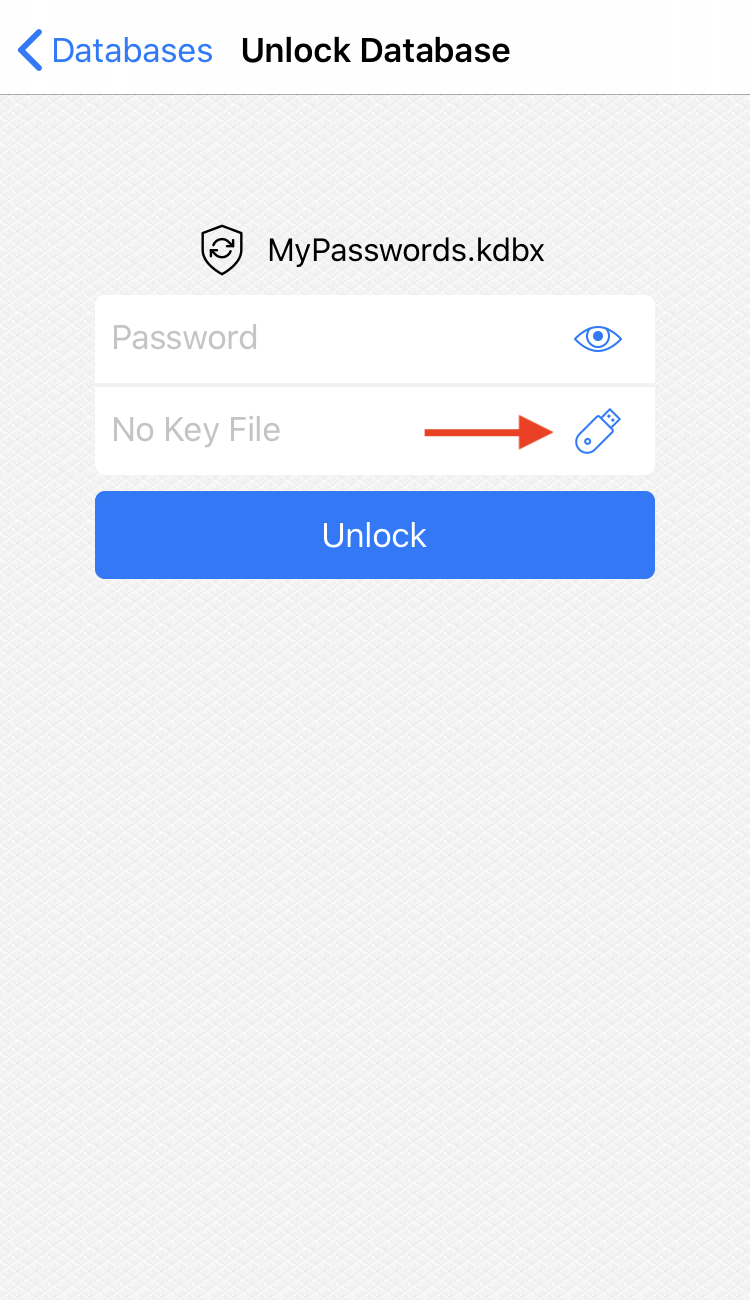
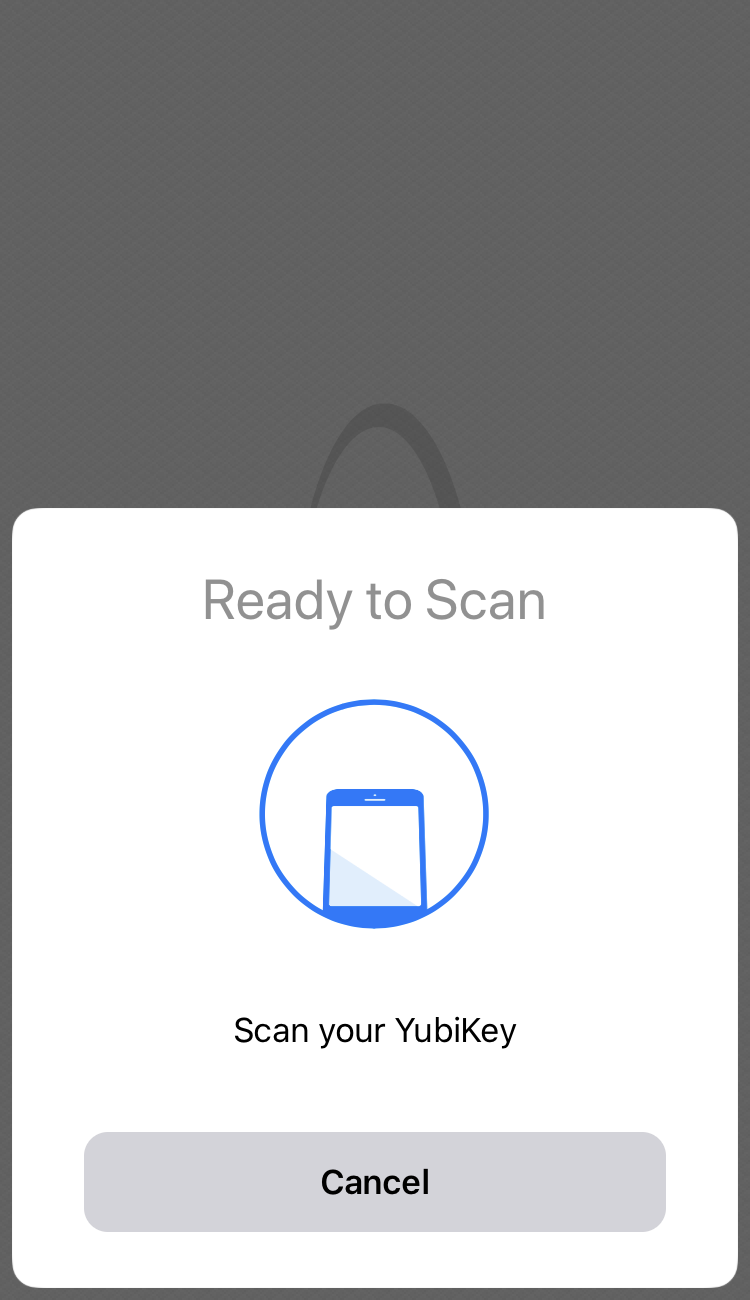
Once prompted, insert or scan your YubiKey (touch it with the top side of your phone). If all the master key components are correct, the database will open up.
Using YubiKey in AutoFill
Apple does not allow Password AutoFill extensions to communicate with hardware, such as YubiKeys.
However, there is a workaround:
- Open KeePassium settings → Data Protection
- Turn on the Remember Master Keys option
- Make sure that Database Timeout is something longer than “Immediately”
- Turn on the Cache Derived Encryption Keys option
- Unlock your database in KeePassium app. KeePassium will remember the decryption key of the database.
- Switch to AutoFill. It will open your database using the remembered key, without asking for YubiKey.
Once your database is edited on any other device, the decryption key would change. Simply unlock your database in the main KeePassium app again; this will update the decryption key for the AutoFill.
Compatibility with other apps
KeePassium uses YubiKey in challenge-response mode. The implementation is compatible with KeePassXC and almost all other apps. The only exception is KeePass 2.x with its KeeChallenge plugin.
- KeePassXC (Windows, Linux, macOS): full compatibility
- Keepass2Android: full compatibility
- KeePassDX (Android): full compatibility
- Strongbox (macOS, iOS): full compatibility
- KeePass 2.x (with KeeChallenge plugin): not compatible
- Why you should avoid KeeChallenge for YubiKey support
- KeePass does not have any other suitable plugin. If you want to use YubiKey in a mobile app, the only desktop option is to replace KeePass with KeePassXC.
Compatibility with devices and YubiKey models
YubiKey compatibility depends on key model, connection interface and device running KeePassium.
- Compatible YubiKey models:
- All 5 Series keys: 5Ci, 5 NFC, 5C NFC, 5 Nano, 5C Nano.
- All 4 Series keys: 4, 4C, 4 Nano, 4C Nano.
- Incompatible YubiKey models:
- YubiKey Security Key Series — no Challenge-Response functionality
- YubiKey Bio Series — no Challenge-Response functionality
However, not all compatible keys will work on every device.
Here is the summary of Apple devices that work with YubiKey in challenge-response mode.
| Lightning keys | NFC keys | USB keys | |
|---|---|---|---|
| YubiKey 5Ci | YubiKey 5 NFC, 5C NFC | YubiKey 5Ci, 5 NFC, 5C NFC, 5 Nano, 5C Nano | |
| iPhone (USB port) |
Full support (via Apple adapter) |
App only + AutoFill workaround |
Not supported |
| iPhone (Lightning port) | Full support |
App only + AutoFill workaround |
Not supported |
| iPad (USB port) |
Full support (via Apple adapter) |
Not supported |
Not supported |
| iPad (Lightning port) | Full support |
Not supported |
Not supported |
| Mac |
App only + AutoFill workaround (via USB side of 5Ci) |
Not supported |
App only + AutoFill workaround |
The USB-C to Lightning adapter has to be made by Apple. During our tests in April 2024, cheaper adapters did not work.
See also
Last Updated: 2024-04-02